
Production Methods for Small Scale Editions
Some alternative approaches to producing small, hand-made editions of playing cards
Some GUIDELINES for PRODUCING SMALL EDITIONS of HAND-MADE PLAYING CARDS
Printmaking is an original, unique, eloquent and engaging way of making art. Prints are created in many different ways. They can be drawn with acid and etched into a smoothly polished sheet of copper; they can be intensely-coloured ink squeezed through a mesh or hand cut into a piece of box wood. Or it might be none of these traditional methods but an artist's very personal working method developed over many years...
 HE TRADITIONAL APPROACH to getting Playing Cards produced has to be by Printing them. But anyone who has had experience of this knows it can be very expensive, and therefore - restrictive. You could use any of several printing techniques, but experience has shown that unless you have the power of a major publisher with distribution channels, you may only sell a few hundred copies.
But, there is hope… for there are a number of alternative approaches to producing small editions:
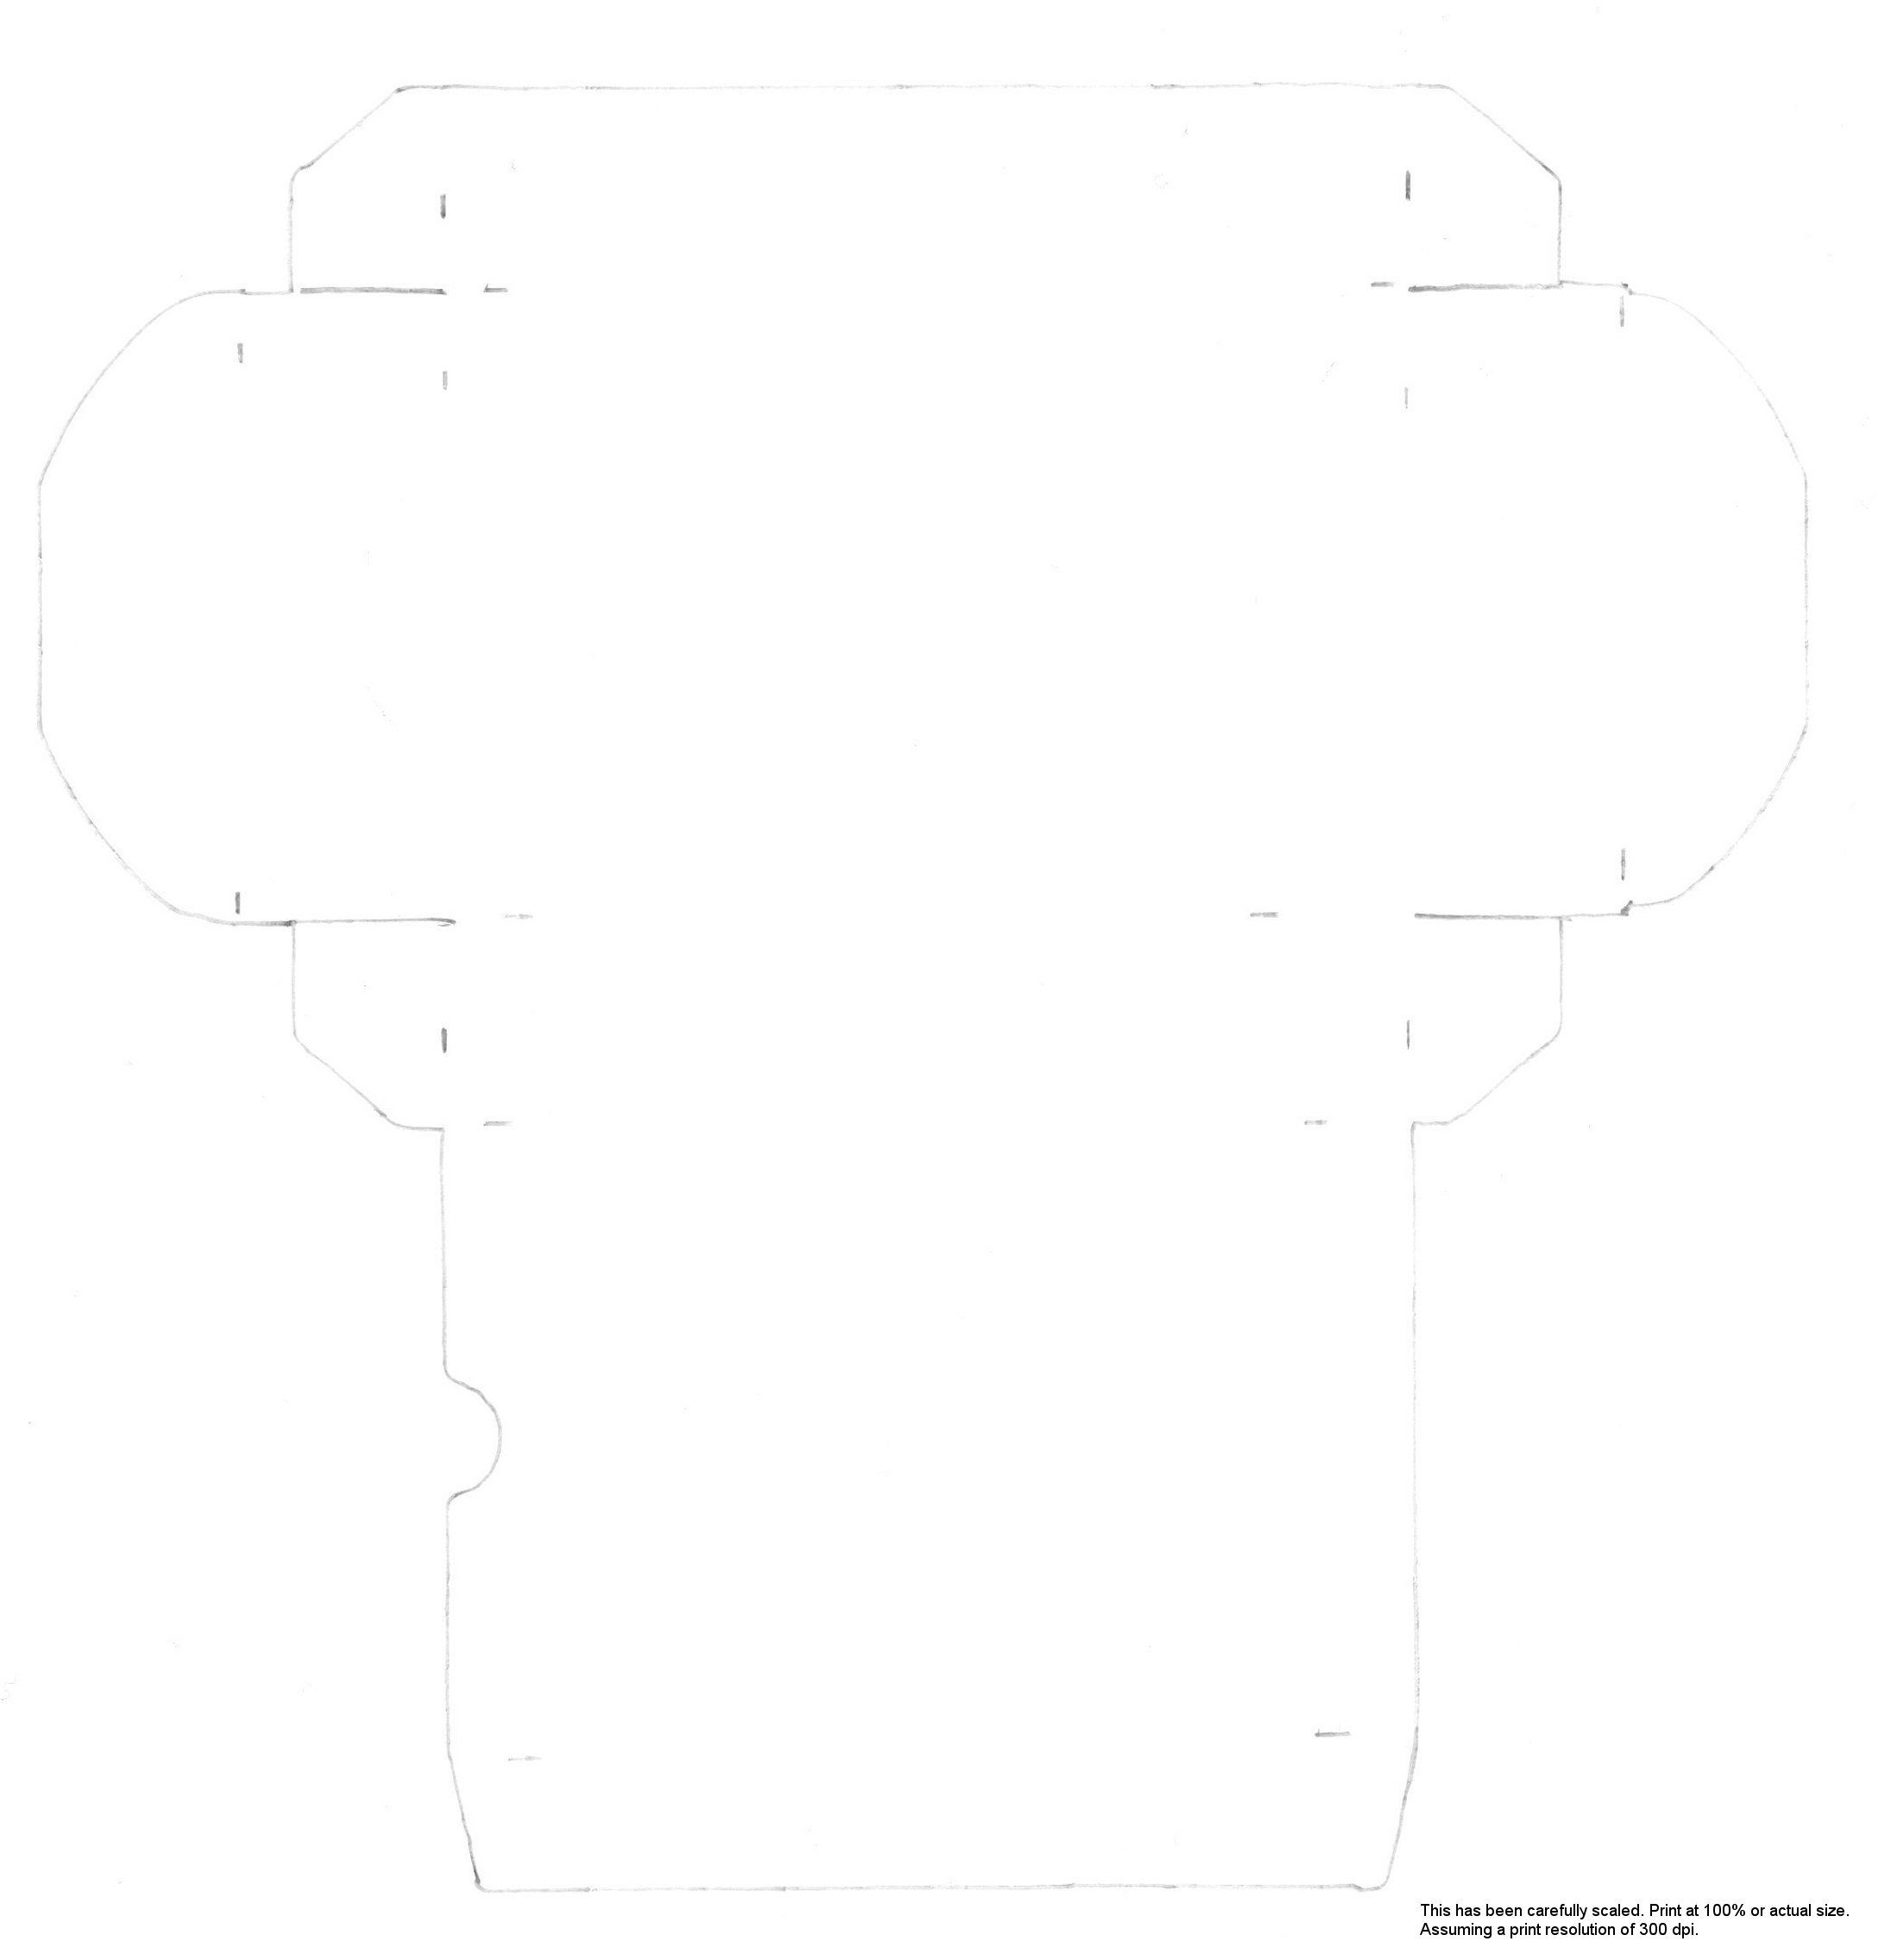
How to make your own tuck box for storing cards
Download PDF file [425 Kb] describing how to make a simple playing card tuck box→
Courtesy Matt Probert.
PRINTING
There are playing card manufacturers all over the world - almost all of them will print your cards for you - at a cost! Some also have retail sections and produce cards to sell into retail, you could see if they like your designs. It is also possible to use a local jobbing printer. Printing can be in Black & White, block colour or full colour; the latter has a number of options depending on the quality required.
Unless you're being 'published' by someone else who will foot the bill, even a small edition can be VERY expensive.
Below is described how it has been possible to get small editions of cards into print - you might like to try a similar approach. Please tell us about your own experiences so that we can share these with everyone.

Peter Wood's PACK OF PEARLS and "HIDDENMICKEYS" were all completed actual size in black on white cartridge paper. The intention was to print 100 packs, around 80 to remain uncoloured and, say, 20 packs that would be hand coloured:
"I approached a printer that I knew and had 'worked' with before. I asked how much it would cost to print, cut and box my cards. I then offered them about 40% more than their quoted price!"
"No, I'm not completely mad (although my wife may have other views!) I offered this payment AFTER I had sold the relevant number of packs. This is not as bad as it seems as the hand-coloured decks take quite a time to complete but sell quite quickly to collectors."
This relationship worked well for the two decks mentioned - enough to encourage the artist to go one step further!
"2000PIPS was a full (6) colour process, each 'card' illustration was individually scanned to get the best colour balance. This was not cheap but the printers paid for this and became my co-publishers. In exchange I handle all publicity & sales and split all monies (after postage) 50/50."
This sounds great, but be warned - selling large numbers of cards can be very difficult. Elsewhere on this site, we have provided a list of possible outlets for your work, but even these may not be enough.
If you can, build into your plan to sell cards at trade prices too, this can be as low as 50% of the retail selling price but it may open up more sales possibilities.
Elaine Lewis adopts a similar approach. After drawing the cards in outline at larger-than-life size in designer's pen and black ink, she has the complete set printed onto sheets of white card in small editions of around 50-100 by a local printer. This is the largest expense, followed by artist's materials, paints, and so on. Elaine then hand colours, cuts out and boxes the packs as required. She also applies her designs onto other surfaces, such as cushions, pottery or fabrics.

Above: Simon Wintle's “Hand-made replica 17th century English playing cards” are finished, cut out and assembled by hand using a simple desk-top guillotine. Learn more →
DESK TOP PUBLISHING
The possibilities for producing playing cards on the desk top computer system are becoming extensive. The quality of the final product will depend on your printer, which might be a laser printer or a high resolution ink jet printer, and also on the type of paper used. The cards can feel so smooth in your hand that you may wish you could play blackjack with them!
I have produced several home-made packs by these means. Whilst the artwork for each card can be prepared in, say, Photoshop, this can then be imported, or 'impositioned' into Illustrator, ready to print off. Another software package which is suitable is CorelDraw, but playing card manufacturers seem to use Illustrator or QuarkXpress.
If you would like to produce a home-made deck of Fortune-telling cards, download: Livre du Destin or Book of Fate a nineteenth century French Cartomancy deck, with titles in French and English, published in Paris, c.1890. 32 cards. Download the entire deck (21 MB) as large size images, suitable for desk-top publishing into hand-made pack. Images courtesy Gilles Daigle.
By adding a scanner or a digital camera into the system, hand drawn artwork, lettering, photographs and textures can be added into the card designs. Using the tools available in your software, a variety of special effects and shadings can be applied, as well as cleaning up the images and balancing the colours. A word of caution: with so many tools at your fingertips, not to mention the vast number of typefaces available at the touch of a few keys, it still takes a lot of care to produce a reasonable result! The use of typography for the indices and captions on the cards requires some knowledge of typeface styles and the functional requirements of a playing card.
Suppose you want to design some playing cards using Adobe Illustrator. A lot of the features in playing card designs are repeating patterns, which are easy to create using copy and paste. This is particularly the case with double-ended cards. Once an outline for a feature has been made, this can be mirrored, replicated, stretched, inverted, filled with colour, etc. all around the design creating patterns. Textured and patterned fills can be very effective. Gradient fill colours must be used very discreetly and subtly. The success of playing card courts depends upon the faces, so try to draw good ones!
For example, Dianne Longley's "Cats, Cakes, Clothes and Cups" playing cards were created as follows: "The images for Cats, Cakes, Clothes and Cups were brought together from a variety of sources. The Cats suit was made from photographs of mine and others generously loaned by friends. Many of the cake images in the Cakes suit came from recipe books. Who has time to photograph cakes before eating them? I spent a fun evening dressing up in a range of outfits and Patricia clicked away with a digital camera to create the Clothes images. I photographed my tea cups for the Cups suit on my kitchen table, again with the digital camera. I created the court cards by initially drawing the King, Queen and Jack with a technical pen. I scanned the drawings and then added colour and collaged faces using Adobe Photoshop. The individual card images were then placed into suits using Adobe PageMaker. Each suit comprised of the usual court cards: King, Queen and Jack, ten number cards and a Joker. The images were then printed through an inkjet printer."

As another example, the image right shows how traditional stencil colouring can be simulated using Photoshop filters such as splatter and wind, along with varying degrees of transparency and slightly offsetting the coloured areas. The palette was selected by studying genuine old cards, and then the colours were applied in layers and treated digitally, before being flattened down into the final product. It is best to build Photoshop images in layered files so they remain editable throughout the production cycle. Although this technique depends on having the memory, disk space and processing power to handle large layered files, it also allows for easier revision or reverting to an earlier version.
Chris Wasshuber has researched How To Make Your Own Playing Cards and is able to supply blank sheets of playing card cardboard in small batches, corner rounders and card cutters at affordable prices. His site is full of useful advice and ideas for making your own playing cards.
PHOTOCOPYING
Shelley Fowles, in her UNNATURAL HISTORY pack, uses photocopying as the means to make copies of her original artwork. "Most of the time spent is on producing the artwork which is intricate, often worked with magnifying glass, in watercolour and gouache. Then the artwork is photocopied and stuck on light card which is laminated. The boxes are also painstakingly hand-made and covered with expensive and beautiful papers. The packs themselves each take a couple of weeks to put together. The materials are quite expensive and so are the colour photocopies. The lamination seals the artwork and makes a sturdy card that can be played with, cleaned and that will last…"
A similar production process has also been chosen by Frank Jensen for his MAIL ARTIST'S TAROT. "The cards were colour-copied on 160 grams paper, four on a sheet, and the copier was adjusted so they received an extra silicon oil covering during copying. When finished, the sheets were hot mounted, using a special hot mounting foil, on black Chromolux cardboard, trimmed to exact size and corners rounded, one by one… Beware, however, this method is extraordinarily time consuming!
HAND MADE

Above: glue being made on an ‘industrial’ scale in the 18th century. Flour and starch were dissolved in warm water and stirred by hand. The solution was then boiled in a copper vessel for 5 or six hours. After being left to cool overnight the paste was sieved to remove any lumps. The resultant paste had sufficient adhesive strength to join the sheets of paper. These operations were usually carried out in the workshop basement area.
The following method has been submitted by Ian Roth (whose 'Unique' deck of playing cards is reviewed elsewhere on this site): I saw that you had some tips on hand making cards on your page and thought I would share a technique that took a while to develop, but ended up giving me great results (unfortunately I did not have 50,000 hours free to make the number of decks that I would have liked to) - but this technique gives good slippage and colours, as well as a consistent card that shows less wear than even the plastic Kem cards.
There is always going to be a difference between things that are made industrially and things that are hand-made. It all comes down to your personal preferences.
First the 54 images were created and made into TIF files. Then, a template was created in Quark for eight cards a page (Quark is a great tool, because you can also make one perfect card, with rounded edges and all, and then duplicate it 53 times). The front of the cards were laid out this way and printed on an EPSON photo printer (they are quite cheap). The cards were printed on thick EPSON matte paper (you can also print on double sided matte paper).
A similar template was created for the back of the cards, with the eight squares being larger than necessary to make sure there was adequate bleed. The backs were printed on one blank page and then laser copied onto the back of the seven sheets with the fronts (saving time and precious ink, and preventing over-saturation of the ink on the page).
I then applied Avery self-laminating sheets on both sides of the seven pages. The laminate is letter size and a clear plastic "sticker" that seals the paper. This ends up creating a "card-like feel" and a waterproof and protective gloss coating to the cards. I used a bone folder to smooth out any bubbles (there were only two or three for the entire batch). The seven sheets were then cut down in an ordinary paper cutter to make 54 rectangular cards.
I then bought a Marvey corner punch (US $8) and punched perfect round corners on the all of the cards (This is a little painful, as the punch is only meant to handle paper, but if you get a hammer and use the hammer to activate the punch on a hard floor, the effect is less painful, and a lot faster, even if you live in a flat and your downstairs neighbours are wondering what you're up to).
The card "sandwich" of the laminate and the board is completely undetectable to the point where people have no idea how the cards were made in plastic. One thing to watch, however, is to make sure the initial paper is opaque enough so that one cannot see through the cards. If anything, this technique is great for sample decks, and perfect for one-of-a-kind decks that actually might get some use. The overall cost is quite low, except for the number of hours spent punching the corners.

See the list of equipment used in an 18th Century Playing Card Manufacturing Workshop, including blocks, stencils, brushes, etc..
COPPER PLATE ENGRAVING AND ETCHING
There are two distinct methods to prepare copper plates for printing: engraving and etching. Karl Gerich's work is a fine example of the second approach. With etching, a copper plate is polished, heated and then given a thin coating of darkened beeswax. When this cools and sets, it is then possible to draw the designs into the wax with a needle-point, thereby exposing the copper surface beneath. The touch can be very fine so that delicate lines, dots and stipples may be achieved. When the plate is subsequently washed over with acid, the exposed copper surfaces are etched out, leaving the remainder of the surface intact where it was protected by wax. The plate is now ready for printing.
The resulting printed lines have a tendency to stand out slightly in relief on the paper, and also the areas of 'white' may contain traces of ink pigment where this was not completely wiped off the plate between each impression. This can be observed in the images of Karl Gerich's work. Click here to see some early examples of engraved cards.
Acid etching can also be combined with engraving, where the lines are manually engraved into the copper surface with a burin, or a very hard, sharp-pointed tool. This requires considerable physical mastery of the technique so as to avoid 'slips' or other mistakes which of course are difficult to remedy.
Wood engraving and traditional woodcuts, despite the modern developments of chemical, mechanical or electronic processes, still remain the most expressive form of illustration, adding a sense of old world chivalry and romance. Copper plate engraving and etching probably come a close second.
QUALITY
Two essential elements that make a playing card a playing card are the paper and varnish.
A. Paper is usually 2 or 3 ply playing card stock often called "black liner board". Most stock is from mills in Germany and France. It is laminated with a black graphite glue which guarantees opacity. Learn more →
B. The "playing card varnish" is a custom formula; most major card makers have their own. The varnish helps determine the "slip" and feel of the cards, how they slide against each other, and protects the cards from grease and dirt. If you are making hand-made cards, you should give some consideration to finishing the cards and making them easy to handle. Card magician Kevin Gallagher says "To me, the design is secondary to how well they handle since they are going to get written on, torn up and generally abused anyway".
With hand-made cards, one can experiment finishing the cards by lightly polishing with wax, soap or fixative spray to make them slippery.
By Simon Wintle
Spain • Member since February 01, 1996
I am the founder of The World of Playing Cards (est. 1996), a website dedicated to the history, artistry and cultural significance of playing cards and tarot. Over the years I have researched various areas of the subject, acquired and traded collections and contributed as a committee member of the IPCS and graphics editor of The Playing-Card journal. Having lived in Chile, England, Wales, and now Spain, these experiences have shaped my work and passion for playing cards. Amongst my achievements is producing a limited-edition replica of a 17th-century English pack using woodblocks and stencils—a labour of love. Today, the World of Playing Cards is a global collaborative project, with my son Adam serving as the technical driving force behind its development. His innovative efforts have helped shape the site into the thriving hub it is today. You are warmly invited to become a contributor and share your enthusiasm.

Activity for Production Methods for Small Scale Editions
Sign in to comment or save this article.
Related Articles

The ACA Liège Game
A curious art-game from the Royal Academy of Fine Arts of Liège, issued in 2000.

Crocheter’s Playing Cards
Crocheter’s playing cards sent to subscribers of the Crochet Society box, 2021.

Gods of Egypt
Gods of Egypt playing cards dedicated to the culture of Ancient Egypt.

Erlenmeyer City Sights
Erlenmeyer City Sights hand-illustrated playing cards by Stephanie Gray, 2015.

Sandton City
African tribal mask playing cards for Sandton City, Johannesburg.

Giffgaff
Giffgaff mobile network playing cards, 2015.

Modern Aces of Spades
Many modern aces of spades are anonymous so that, in the absence of any other information, the colle...

Monsters
A collective of artists known as Monster Illustration produced a deck entitled “Monsters” in 2004.

Anonymous Dutch deck, 1940s
Anonymous Dutch deck, 1940s

Hycrest Modern Royalty
Published by the Hycrest Playing Card Co., New York, c.1931. The large suit symbol behind each figur...

Karl Gerich No.1
The first entry in the catalogue, dating from c.1982, shows full-length figures with their symbols o...
")
Vaivorykste (The Rainbow)
Vaivorykštė ('the Rainbow') playing cards manufactured in Lithuania by Spindulys, 1930s. The deck ha...

Baraja Digital
Baraja Digital by Naipes De La Cigüeña, 1990.

Playing Card Design
The playing card calls for artistic treatment and although the constrained size imposes some limitat...

Queen of Hearts
“Queen of Hearts” by Josie Callipari, winner of the Brian Tucker Accounting Desert Fantasia Award 20...

About Witta Jensen
WITTA JENSEN… on the cards.


About Shelley Fowles
Shelley Fowles was born in South Africa but has lived in the United Kingdom since 1979. She trained ...

About Peter Wood
Peter Wood is a UK based artist.

About Catherine Kelly
Catherine Kelly, M.A. Paint and Print, B.A. History of Art and Fine Art Painting, is an artist worki...
Most Popular
Our top articles from the past 60 days


